Categories
Uncategorized

How to Get over Fear of Presenting in Class (7 Quick Remedies)

The announcement “In this subject, the assessement is a 45-minute presentation,” immediately triggers your fear of presenting in class?

Oh no! Where’s the exit?

The mere thought of your next presentation sends your pulse racing, induces sweat, and triggers an urge to flee? Then, it’s time to conquer your fear of presentations.

Don’t worry, from personal experience, I know exactly how daunting it can be to stand in front of the entire class and have to deliver a speech.

To help you feel more confident in your next presentation, I’ll share 7 tips in this video on how to manage your stage fright and perform with confidence.

#1 Practice Makes Perfect

Practice? Well, that’s nothing new. True, but this tip is indispensable for overcoming your fear of presentating in class.

The better prepared you are for your presentation, the greater your confidence will be, and simultaneously, your fear and nervousness will decrease.

Once you’ve developed your presentation, practice delivering it. Start by presenting to yourself.

It’s often recommended to practice in front of a mirror. This is a great way to see and improve your body language.

However, it can sometimes feel odd to watch yourself in the mirror, especially if you’re just starting out and feeling uncertain.

Initially, you can practice without a mirror and go through the presentation out loud at your desk.

Or simply walk around the room while going through your speech (this is my favorite method).

Speak loudly and clearly. The greatest learning effect comes from having to actually articulate the sentences you’ve planned.

Just by presenting out loud, you’ll save yourself from long pauses for thought when it really counts, and you’ll automatically gain more confidence.

Next, you can practice your speech in front of a mirror or even record yourself on video. Even if it still feels a bit uncomfortable, give it a try!

No one but you will ever see it, and you can observe your own body language and identify weaknesses in your delivery.

A test audience is also great for practicing your presentation. Ask family or friends for feedback!

This way, you’ll go into the presentation even more confidently. It’s important to practice exactly how the presentation will be conducted at the university. So, use the same laptop, the same notes, and slides.

Don’t forget to also prepare for possible discussion questions. A stuttering discussion can ruin a lot of your hard work.

By the way, even the world’s great speakers practice before they go on stage. All professionals practice, which is why they are so good.

If you want to learn more about this, I recommend reading “Turning Pro” by Steven Pressfield.

#2 Convey Confidence with Body Language

During a presentation, it’s not just about what you say, but also how you convey it nonverbally.

Body language plays a crucial role, as it affects not only the audience but also your subconscious.

Even if you’d rather shrink and disappear into the ground, stand up straight with a firm stance, feet a bit wider than usual, pull your shoulders back, and put on a smile – you’ll automatically feel more confident.

And if you’re still panicking on the inside, then just don’t let anyone see it. “Fake it ’til you make it.”

If some of your friends are among your classmates, even better. Try to make eye contact with them. They want you to succeed, and as your cheerleaders, they boost your confidence!

From my own experience, however, you need to master Step 1, practicing the content, before you can optimize your body language.

If you have to constantly think about what to say next, you’ll forget to pay attention to your posture.

The more you practice, the more attention you can give to the details, and the better you can overcome your fear of presenting in class.

If you don’t know what to do with your arms, hold a pen or a presenter. This gives your hands something to do, and you can gesture more effectively.

Overcoming the fear of presentations

#3 Calmness through Breathing and Relaxation Exercises

In stressful situations, we tend to breathe shallowly and quickly, which amplifies our nervousness. Through targeted breathing exercises, you can interrupt this reaction, lower your pulse, and get your nervousness under control.

A simple technique is diaphragmatic breathing, where you breathe deeply into your belly and slowly exhale. This improves oxygen flow, better energizes your brain, and automatically calms you down.

Place your hand on your belly to feel if you’re really breathing deeply into it.

You can also try to take a deep breath through your nose after your normal, shallow breath. As if you were trying to fill your lungs completely with air. Repeat it 3 times.

This technique slows down your pulse and calms you down.

Relaxation exercises like progressive muscle relaxation or meditation can also help reduce your tension and strengthen your concentration.

Regular practice of these techniques can decrease your fear of presenting in class over the long term and help you approach presentations more calmly and confidently. If you’re not already using a meditation app, now is the time!

My favorite is “Waking Up” by Sam Harris.

Before your next speech, it’s definitely worth spending a few minutes on breathing and relaxation exercises. You don’t necessarily have to do the exercises and meditations right before your speech, as that wouldn’t be practical.

Immediately before your speech, however, you will remember the techniques you have practiced extensively and can apply them unnoticed and spontaneously.

#4 Embrace Your Inner Stoic

“Surely I’ll forget half of it.” “I’m not prepared at all.” “My presentation is bad, the others are much better.”

Is your inner critic in top form on the day of the presentation? We definitely need to counteract this, as it unnecessarily increases your fear of presenting in class.

You can’t change your external circumstances. But you can change how you respond to them.

  • Accept Your Emotions: It’s normal to feel fear or nervousness. Accept these feelings, but don’t let them dictate your actions.
  • Focus on What You Can Control: Concentrate on the things you can influence in your preparation and presentation, and let go of things that are beyond your control, such as the audience’s reactions.
  • Use Negative Visualization: Imagine the worst-case scenario as mental training. Visualize your presentation going wrong, but then visualize how you calmly and collectedly respond to it.

Familiarize Yourself with Stoic Philosophy if your emotions and fears often overwhelm you. Often, giving a situation a new, more positive framing is enough to become more composed.

Look into books by Ryan Holiday and William B. Irvine.

overcoming the fear of presentations 2

#5 Leave Nothing to Chance

You’re optimally prepared, the speech is ready, and belly breathing is already showing its effects. Time to start!

Quickly connect your laptop… Oh God, what kind of projector is this?

Why doesn’t the cable fit? And suddenly, the nervousness rises, and you’re completely thrown off.

To avoid this, familiarize yourself with the technology and the premises in advance. Arrive at least half an hour early and test the technology calmly.

Even better: Stay a little longer in the room the week before and get familiar with the set up in the room. If you want to show a video, test the sound and whether it plays through the room’s speakers.

Also, prepare backups. Prepare for the eventuality that the internet in the room doesn’t work. Download all files locally to your computer. Pull everything onto a USB stick, just in case. Bring your own HDMI adapter, just in case.

Be a pro. Be prepared. This way, you can overcome your fear of presentations.

#6 Focus on the Essentials

You’re deep into the topic, and so far, everything is going well. But what’s going on in the third row on the left? Why is someone yawning? And in the fifth row, someone has their head on the table!

Am I putting everyone to sleep? Even the professor just glanced out the window! Oh no! Even the Stoic gods can’t help me now. My presentation is boring and therefore bad!

Don’t make assumptions.

Try not to take everything personally. Even if someone yawns, it doesn’t automatically have to do with your presentation.

Maybe the person just slept poorly or was out late at a party. Stay focused on yourself and don’t be distracted by the audience.

I’ve had rows of students fall asleep during my lectures. But honestly, that’s happened to me before, too. It certainly wasn’t because of the lecture… 😉

It’s normal for different reactions to occur in the audience, and this doesn’t necessarily reflect the quality of your presentation. Stay calm and focus on what you have prepared well and how you want to convey the knowledge.

If they’re not listening, it’s their loss.

You do your part.

overcoming the fear of presenting in class

#7 Always Compare Yourself to Yourself

You don’t want to forget anything during the presentation, misspeak, blush, and definitely want to be able to answer ALL questions.

If you aim to do everything perfectly, you’re more afraid of failing. Try not to be so hard on yourself because there’s no such thing as perfection.

Even Justin Bieber has had a blackout during a concert, and the news anchors mess up despite years of experience.

And who remembers it the next day?

No one.

Realize: Nothing is perfect, so you don’t have to be perfect either. If you lose the thread, pause for a moment, collect yourself, and continue.

As long as your presentation is 1% better than your last, you’re doing everything right.

You’ll find that it becomes easier to give a presentation with each one.

So, be patient with yourself and don’t expect to overcome your fear of presentations overnight.

It’s a learning process, and with each presentation, you’ll become more confident and better. University is there to grow and make mistakes.

That’s the only way you’ll improve.

Why Nervousness (in Moderation) Can Also Be Positive to overcome your fear of presenting in class

You can alleviate the fear of presentations with the aforementioned 7 tips and a bit of patience.

However, a certain degree of nervousness before your presentation will almost certainly remain.

And that’s a good thing and often even makes your presentation better. So, you don’t need to completely overcome your fear of presenting in class.

Our body produces adrenaline in stressful situations. This hormone boost provides your body with more oxygen and energy – you’re more alert and your concentration and performance improve.

In short: The tension helps you to successfully manage the presentation.

If you view your nervousness as a positive companion, you can accept it as part of the natural process and deal with it. It’s important to recognize that you don’t have to be perfect and that it’s okay to be nervous.

Pros are nervous too. Nervous but prepared. Be a pro.

Categories
Uncategorized

How to Write a Thesis in 2 Weeks: A 7-Step Emergency Plan

Need to write your 10,000 word thesis in 2 weeks? Oh dear! Well, let’s quickly figure out a solution.

Since you don’t have much time, the next 15 minutes of reading should be enough.

In this video, you’ll get personal emergency coaching consisting of 7 steps.

If you follow these steps one after the other in the given time, you still have a chance to submit your thesis in 2 weeks without failing.

Disclaimer Before we start, here’s a 10-second disclaimer:

I would never, ever recommend letting it come to this. If you’re only giving yourself 2 weeks for your thesis or final paper, you’ll have your reasons. These reasons are none of my business and are entirely your own.

If your goal is to excel intellectually in your thesis and get a top grade, then this video is not for you—in that case, you should check out my other tutorials.

This article is for you if you just want to get your thesis onto paper as quickly as possible—and pass.

So, let’s get to work.

#1 Lower Expectations and Drastically Increase Priority

The first question that comes to mind in such a situation is this:

Is it even possible to write a 10,000 word thesis in 2 weeks?

Of course, it’s possible.

It is even possible without any dirty tricks, plagiarism, or a Red Bull poisoning.

But only under certain conditions.

Lower Your Expectations to Zero

The first condition is to accept the situation and eliminate your expectations of a good grade or anything else. Approach the situation stoically and do your best to show yourself that you don’t give up.

That you don’t throw in the towel but make the best of the situation.

Visualize that you fail this thesis and accept that too.

This shouldn’t lead you to half-hearted action in the 2 weeks you have left. Rather, these 2 weeks are your chance to take on the challenge.

Now you can intensively train how to write a thesis in 2 weeks.

And if a second attempt comes, you won’t have to start from scratch.

Treat Your Thesis as Priority Number 1

Whether you can write a thesis in 2 weeks doesn’t depend on whether you can write well or are blessed with other talents. What decides now is your time management.

If you don’t make your thesis your top priority, it will be very difficult.

If you really want a chance, then your thesis must be the only thing you focus on now.

(Besides your health, but more on that later)

Make a contract with yourself and signal to your environment that you will be unavailable for a short time as usual. Put your phone in the fridge in the morning and don’t get it out until after work.

(Please don’t actually put it in the fridge, put it in a drawer.)

#2 Your Research Strategy for a Thesis in 2 Weeks

Enough of the admonishing words, now let’s move on to the substantive strategy for your daring venture.

The first strategic decision you must make concerns your research strategy.

What do I mean by that?

Basically, your research question and the method you want to use to address it.

Scientific papers in social sciences, but also beyond, can be divided into empirical and non-empirical works.

Why No Empirical Thesis?

For an empirical research design, you need qualitative or quantitative data that you collect through a survey or interviews and then analyze.

I would advise you, if you can make this decision yourself, to not pursue an empirical research design in this situation.

Not because it’s more difficult or time-consuming than a conceptual or literature-based work.

The reason is that you depend on other people.

You need to get people to fill out your survey or give you an interview.

Any situation in which you rely on others should be avoided if you want to write a thesis in 2 weeks.

Last Resort: A Literature-Based Thesis?

The only scenario in which an empirical research design makes sense is if you have already collected the data or have been provided with it.

Or any other case where you completely control the implementation of your methods, such as a simulation.

Bachelor thesis in 2 weeks

So, ask yourself what dependencies you have in your strategy and eliminate them all.

If you don’t have data available, you’re left with a literature-based thesis.

You can write a review for which you collect your “data” in the form of scientific articles.

The good thing about it is that you can decide for yourself how quickly you get your literature.

What types of reviews there are and what the literature collection looks like, you’ll learn in my tutorial on how to write a literature review.

Not all supervisers would expect you to write a critical review or a systematic review in a 10,000 word thesis.

Your thesis can also address a research question that you answer with an unstructured analysis of literature.

However, I would recommend choosing a recognized review strategy and implementing it step-by-step.

The advantage is that you can refer to one or two methodology articles that explain exactly how to proceed.

All you have to do is follow the instructions.

So you don’t have to waste thoughts on how to structure your thesis or what your research question should look like.

Everything is predetermined, and you save valuable time and energy.

If you choose the research strategy of a standalone literature review, you don’t need to feel bad about writing a thesis that is less valuable than an empirical one.

The synthesis of literature is an important part of scientific practice and can lead to great results!

#3 Set Up a Work Plan to Write Your Thesis in 2 Weeks

The next step in your emergency plan is a strict time allocation. Since every minute counts, you must work with sharp deadlines that you keep for yourself.

To not make it unnecessarily complicated, I suggest dividing the remaining time into three equal thirds.

Bachelor thesis in 2 weeks 2

1. Data Collection (first third)

2. Data Analysis (second third)

3. Text Production (third third)

Assuming you have 2 weeks available, you have 4 days and a few hours per third. Set the deadline for each third in the calendar and stick to it.

This way, you also have a sense of achievement every 4 days that motivates you to keep going.

Now let’s focus on each specific third and what you need to do.

#4 Data Collection (First Third)

For simplicity, let’s assume you’ve chosen a systematic literature review as your research approach.

Literature Search & Screening (Day 1)

On this day, your goal is to gather all the literature you need. Define your search key words and databases and try to land somewhere between 100 and 500 hits.

Once you’ve collected all the hits based on your keywords, the screening follows in the second half of the day. Now read the titles and abstracts and sort out.

If you end up somewhere between 20 and 30 relevant articles, that’s OK.

If you’re below that, keep searching through forward and backward search. You’ll learn what that is in my other tutorial on literature reviews.

Read, Read, Read (Day 2 and Day 3)

Now make yourself comfortable somewhere where you’re undisturbed and read your 20-30 relevant articles.

No one said you can’t have fun with your turbo thesis. So go to your favorite place and start reading. You can’t get around reading. Because without input, no output. The more you read on these days, the easier text production will be later on.

Collect text passages for indirect and direct quotes in an excerpt table.

How to set it up, you’ll learn in my tutorial on how to write an excerpt, where you also get a template for a table to start with right away.

Literature Management (Day 4)

Load all your relevant articles into your literature management tool (e.g., Mendeley or Zotero) and check if all metadata are correctly entered.

If not, supplement them for each article. If you have additional literature that you already know from your studies, add it and check the meta data of those.

If your thesis has about plus or minus 10% as many references as pages required, then you’re in a good range regarding the length of your reference list.

For a literature review, you can rather assume plus 10%.

Don’t skip the steps with literature management, because at the end of text production, you can generate your bibliography with one click and save valuable time.

If you still have time left, continue reading your 20-30 relevant articles.

Bachelor thesis in 2 weeks 3

#5 Data Analysis (Second Third)

The next 4 days you’ll be busy with data analysis. You’re preparing everything for the results and discussion section of your thesis here.

Analysis (Day 5-7)

For a qualitative evaluation of literature, as is the case with a most review types, the analysis mainly consists of coding.

This is nothing more than forming abstract categories based on your material, which consists of your 20-30 relevant articles. You can find plenty of tutorials on coding techniques on my channel.

The goal now is to form categories that summarize the contents of all your relevant articles. That’s now your task.

No matter which method you follow, empirical, literature-based, programming, design science – watch how the pros do it and follow their structure.

Scientific papers always follow the same blueprint. You just need to recognize the blueprint that is right for your thesis, adopt it, and fill it with your own content.

It’s not necessary to reinvent the wheel. On the contrary: Your supervisors want to recognize a blueprint that is common in their research discipline.

Creating Figures and Tables (Day 8)

Create a figure for your methodology section that reflects your data collection.

In the findings section, add tables that summarize your literature analysis.

For the discussion section, add a table or figure that abstracts your results (which are the categories you have built) and provide a small theoretical contribution (e.g., organize the categories in a small framework).

Again, I can only recommend that you take an example from existing research papers.

It is important that you create all your figures yourself and insert them in high resolution into your thesis. No pixels!

Detailed tutorials on writing methodology chapters, a findings and discussion section can be found on my channel or my online course.

Check out the video description for more info.

#6 Text Production (Third Third)

The last third is dedicated to text production. Don’t be intimidated by the fact that you haven’t written anything yet.

In the first and second thirds, you laid the foundation for what you’re writing about. If you start writing on day 1, you write into the blue without knowing where the journey is going.

Normally, I would recommend not starting with the introduction. In this case, however, you have already done all the preliminary work and can “write from the top.”

Open your literature management software and your excerpts from the first third and get started.

  • Introduction and Background Section (Day 9)
  • Methodology and Findings (Day 10)
  • Discussion and Conclusion (Day 11)
  • Revision (Day 12)

On day 12, you start again with the introduction and revise all chapters so that they are linked to each other.

Use the same terms, add references where you need more evidence, and check where you can make grammar improvements.

If you’ve been counting, this emergency plan leaves 2 days left.

At least one day is a buffer for formatting. After all, you still have to create your reference list, maybe an appendix, proofread and print your work, prepare a digital submission, and so on.

The last remaining day is your joker. Save it as long as possible and use it for unforeseen emergencies that are more important than this stupid thesis.

If everything goes well and you still have the joker day after completing the second third, then use it for a break. Which brings us to the last point of the video.

#7 Mental and Physical Health Management

As stressful as it may sound to want to write a thesis in 2 weeks – a 10,000 word thesis is by no means more important than your health.

You can simply write it again and failing is not bad at all. Who cares?

Only go through such a sprint, as I have described it, if you feel physically and mentally fit. If you’re already at your limit, then listen to your body and don’t make it worse.

Your health always has priority number 1, because if it’s out of balance, then you won’t enjoy a passed thesis anyway.

Since this emergency plan requires full days of work, I recommend planning them intelligently.

Work with 90-minute deep work sessions and take breaks in between.

In the middle of the day, I recommend a longer break. Go running or to go to the gym – after that you can continue fresh.

In the evening, set a limit that you don’t exceed. So that you still have enough time to wind down and don’t get less than 8 hours of sleep.

Try not to rely too much on junk food and caffeine, but on food that supplies your brain as best as possible.

Over a period of 2 weeks, it makes a big difference what fuel you give your body.

And now stop procrastinating and get started – time is ticking!

Categories
Uncategorized

Active Recall: The #1 Study Technique Behind Every A+ Exam

Why doesn’t anyone teach us how to study properly for exams?

I know students from my time at university who studied for 10 hours every day and still failed the exam. How is that possible?

What do people do differently to achieve better results in less time?

One thing I can clarify upfront: they’re not necessarily smarter.

They simply have a better study method at their disposal.

In this article, I’ll explain the Active Recall study method, which has been found to be the key to peak academic performance in numerous scientific studies.

Passive vs. Active Learning

When it comes to excelling in exams, it’s not just about the number of hours you spend studying, but rather the effectiveness of your study methods.

In a comprehensive 58-page meta-analysis conducted by Dunlosky et al. in 2013*, examining various learning approaches, the authors revealed that commonly used techniques such as re-reading, highlighting, or summarizing notes often do not yield the desired results.

But why do these methods remain so popular?

The answer is quite simple: they are straightforward and have been the traditional way of studying for a long time.

Reading and highlighting notes are very convenient.

And who hasn’t experienced this: after reading something multiple times, you might even feel well-prepared.

However, a word of caution!

When suddenly asked for specific details, many find themselves at a loss. There’s a difference between merely recognizing information and actually recalling it.

Active Recall Learning Method

The Study Secret: How Our Brain Functions

To understand the best way to study, let’s take a brief journey into the realm of neuroscience. To make this more relatable, I’ll illustrate it using the example of Belinda.

Picture Belinda as she prepares for her upcoming exam, diligently reviewing her lecture slides repeatedly. At this very moment, various regions of her brain are operating at full capacity.

The occipital lobe is busy creating mental images of what she’s currently perusing, while the angular gyrus and the fusiform cortex are hard at work, deciphering the meanings of the words she’s reading.

Once the information has been processed, the brain dispatches it to the hippocampus – essentially the brain’s memory hub.

But here’s the twist: if you merely read through notes, only a fraction of the information tends to stick. Think of it as you would strengthening your muscles: it requires targeted exercises.

Similarly, your memory – especially the hippocampus – needs the right ‘workout regimen.’

This is where the Active Recall study method comes into play.

While straightforward reading primarily activates the visual aspects of your brain, the hippocampus often gets sidelined.

Hence, passive study techniques like reading scripts or highlighting notes pale in comparison to Active Recall.

What Is the Active Recall Study Method?

Active Recall operates by compelling our brains to actively engage in the study process. Instead of passively absorbing information through reading or listening, Active Recall encourages us – as the name implies – to actively retrieve information from our memory.

The act of actively recalling information trains the hippocampus and increases the likelihood that you’ll remember the information when you need to recall it later (e.g., during an exam).

When employing the Active Recall study method, you can retain what you’ve learned for a significantly extended period and apply it in various contexts.

Let’s explore five ways to incorporate the Active Recall learning method into your exam preparation.

#1 Stop and Recite

Following your reading of a section, momentarily set aside your study materials. Attempt to express the content in your own words.

Afterwards, retrieve the script and compare: What did you manage to remember, and where are the gaps? Fill in those information gaps using the script, and repeat the process until you’ve confidently internalized the content.

Active Recall Learning Method 2

#2 Flashcards

Flashcards have been a tried-and-true study method for many students for quite some time. Even the act of creating the cards, where you must articulate information precisely, serves as an effective part of the exam prep.

In today’s digital age, you can leverage tools like Anki to craft flashcards. Anki incorporates another study method that works particularly well for memorization, known as “spaced repetition.” This means that flashcards are revisited at specific intervals.

These intervals are carefully calibrated to enhance your ability to remember the content effectively.

However, a word of caution is in order: when using flashcards for studying, it’s crucial not to overlook active recall.

What do I mean by that? As soon as you can’t explain a term or concept, flipping the flashcard to reveal the answer right away won’t be enough.

This approach does not align with active recall because it doesn’t provide your brain with the opportunity to recall the information from memory. Instead, take a moment to challenge yourself to explain as much of the answer in your own words as possible before checking the back of the flashcard.

Additionally, a small tip regarding flashcards:

They often require you to condense information significantly. This can lead to a situation where you may remember numerous isolated facts but struggle to grasp the broader context or how these facts interconnect.

#3 Create Questions: Your Path to Profound Understanding

Instead of relying solely on your study materials and flashcards, try crafting your own questions related to the content you’re studying.

This strategy encourages you to critically evaluate what you’ve learned and ensures you maintain a firm grasp of the overall context.

Creating questions actively engages your learning process, allowing you to forge stronger connections between the new information and your existing knowledge.

Following each chapter or section, make a note of important questions, and later, challenge yourself to answer them without consulting your notes.

Active Recall Learning Method 3

#4 Engage an Audience

A highly effective way to master the material is by teaching it to others.

This process activates various cognitive pathways in your brain. Try explaining the subject of your exam to your classmates, friends, or family members.

Doing so compels you to think deeply about the topic and structure your explanation logically. Furthermore, if you encounter difficulties during your explanation, it serves as an immediate indicator of areas where you need improvement.

Pro tip: In the absence of a live audience, you can even imagine one or engage in a chat with ChatGPT. You can prepare the AI with a prompt to ask you specific questions.

If you’re interested in a dedicated tutorial on using ChatGPT for exam preparation, feel free to leave a comment under this video.

#5 Utilize Past Exams as a Recipe for Success

Reviewing past exams is like a trial run for the real test. You become familiar with the question formats and develop an understanding of what to anticipate in the exam.

When you tackle previous exams under timed conditions, you’ll also hone your time management skills and gauge your level of readiness.

An additional benefit: The more you engage in this practice, the more at ease you’ll feel during the actual exam because you’ll possess insights into what lies ahead.

The Drawbacks of Active Recall

Certainly, Active Recall boasts numerous advantages, but are there any downsides? Undoubtedly!

This method can be rather demanding. It necessitates true engagement and cognitive effort, which is substantially more challenging than simply skimming through your notes or reading the script.

Particularly with complex subjects, it can be frustrating when answers don’t readily come to mind. This study approach requires stepping out of your comfort zone and demonstrating substantial initiative.

Yes, the allure of quickly consulting your notes may be strong, but trust me, the additional effort required by Active Recall is well worth it!

*https://journals.sagepub.com/doi/abs/10.1177/1529100612453266

Categories
Uncategorized

Finding Articles for your Literature Review: The 5 Biggest Mistakes

You can’t figure out the process of finding articles for your literature review?

I hear this a lot.

The most common question I get from students is this: The topic I’m writing about is so new, there’s just no literature on it. What should I do?

In this article, we’ll get to the bottom of this. To do this, we’ll discuss the 5 biggest mistakes in searching literature for your research.

If you stick with it until the end, I even have an example for you on how you can craft an amazing literature review section, even if at first glance there seems to be no literature about the topic.

https://youtu.be/an5eqrgdd7U

#1 Too narrowly defined search terms

The first mistake students make when trying to figure out how to search for literature effectively is using too narrowly defined search terms.

The results of a literature search can only be as good as the filtering mechanisms you use.

Let’s use a simple example. For this, we need a topic that is so new that there is little or no literature to be found on it.

The example is: Universal Wallets

Universal Wallets are storage places for digital valuables. Maybe you have your own digital wallet to store cryptocurrencies or NFTs in.

In a Universal Wallet, however, you can store not only NFTs and coins but also other things like digital identity documents or other proofs of your identity.

Boolean Operators

For searching in literature databases, finding literature can be as simple as entering search terms. Using Boolean operators can help you to be more effective in your search.

If you are doing a systematic search process that you want to document in your methods section, this is an absolute must, because it ensures replicability.

But even if you keep your search terms for yourself and write a “regular” literature review section, Boolean operators can help you big time.

Especially the “OR” operator. For example, with “Universal Wallets,” you would get a low number of hits for the search term “Universal Wallet” in most databases.

In Google Scholar, however, an algorithm automatically combines your search term with synonyms and also gives you the next best results.

But if you’re searching on another database, that’s of no help to you.

Through the Google Scholar search results, though, I came across synonyms that I would never have searched for.

Wireless Wallets, Cloud Wallets, Electronic Wallets, Hardware Wallets, Wallet System, and Mobile Wallet seem to be related terms.

From this, you could make the search string “wireless” OR “cloud” OR “electronic” OR “hardware” OR “mobile” AND “wallet” for your database search on Scopus, Web of Science and so on.

You’d have to search for Wallet System separately or use brackets to include the term “wallet system.” It’s just a bit cumbersome because here “wallet” is the first word and not the second.

finding literature

Forward and Backward Search

If a refined database search yields no results, then you need to delve into some other tricks.

With a forward and backward search, you can find the sources upon which the few hits you did find are based, or sources that have cited them afterwards.

The best hit for the term “Universal Wallet” was the paper “Universal Wallets” by Jorgensen and Beck (2021). For the backward search, we simply look at the bibliography and see what we can find there.

Ha!

One paper cited there uses the term “Digital Wallet.” That’s something I could have thought of by myself.

But most often, when finding literature, I do not.

Now, searching for “Digital Wallet” yields endless results. A digital wallet is, of course, not what is meant by “Universal Wallet,” but it is still a related technology.

Thus, it’s perfectly feasible to build on the term “Digital Wallet” to describe what exactly is new about a “Universal Wallet” and why we cannot simply transfer the research on digital wallets to this more nuanced version of the technology.

#2 Inappropriate Databases for Finding Literature

The search terms are one thing. But if the database you are searching on simply does not cover enough sources, then even the best search terms and operators won’t help.

When you use databases, primarily use those in which the research of your own discipline is indexed.

A medical researcher searches on PubMed, a computer scientist on IEEE, and a psychologist on PsycNet. However, sometimes it pays to look beyond the confines of a discipline.

So make sure you also check out interdisciplinary databases. This could be something like Google Scholar, Scopus, or Web of Science.

Or you could look directly into another discipline if you already have an idea of who else might be interested in your topic outside your research field.

The more you can cover with your databases, the better. In the worst case, you find nothing there. But at least you’ve tried.

#3 Old Wine in New Bottles

Regarding “Universal Wallets,” there is certainly a difference compared to “Digital Wallets” or the good old-fashioned wallet.

However, this may not always be the case with other terms.

Take, for example, the topic of Digital Transformation.

The term has only been a trend topic for a few years, and since then, there has been a lot of research on it.

But what’s actually new about it?

Haven’t companies been introducing technology to improve their processes for 50 years?

Yes, they have. And there’s plenty of research literature on that. It’s just not found under the label “Digital Transformation.”

But if you search for “IT-enabled Organizational Transformation,” you get some hits from the last millennium!

And these hits might be relevant for someone wanting to study Digital Transformation.

So, when it comes to your topic, ask yourself: Is the topic really as new as the term describing it?

#4 Too Much Description

This mistake deals with the goal of your literature search. You want to write a literature review section on your topic and diligently cite relevant literature.

This approach isn’t necessarily wrong.

But you write a truly excellent literature section when you change your goal.

A poor literature review section merely recounts research on a topic but fails to gather enough relevant literature.

A mediocre literature review section manages to do so, but only describes what has been researched on the topic.

A fantastic literature review section gathers relevant literature, explains what has been done so far, and critiques or interprets what this means.

So, especially with a new topic, don’t focus too much on finding literature and citing every single source that somewhat fits the topic.

Instead, try to develop your own argument using a handful of relevant findings. For example, you could explain the difference between the new term and existing ones.

Or you could further develop the argument you used for motivation in your introduction.

We’ll look at an example of this at the end of the video.

finding literature 2

#5 Your Doughnut Has No Hole

If you’re writing a non-systematic literature review section, completeness is not a criterion. So your “cheese” of literature can have holes, as long as you develop an exciting argument.

But if you have a sweet tooth, try imagining the metaphor of a doughnut.

Let’s say you’ve convinced me, and your topic is indeed so new that there’s little research on it. And Finding literature isn’t always straightforward.

What you can do then is not look for the hole in the middle, but for the surrounding dough. What are the terms and phenomena that are closely related to your topic?

Work your way through the databases, gathering literature on somewhat broader topics and terms, and approach the doughnut’s hole argumentatively.

For “Universal Wallets,” you could start with the topic of Digital Wallets, explain what Crypto-Wallets are, and from there move on to Universal Wallets.

An Example for a Literature Chapter on a “Brand New” Topic

As luck would have it, I found an excellent example for you. In their paper on “Universal Wallets,” Jörgensen and Beck (2021) did almost exactly that.

They start not with the topic of Digital Wallets but directly with Crypto-Wallets. That’s how they begin their literature review section.

When it comes to “Universal Wallets,” they continue to cite literature.

But if we take a closer look, we realize that this literature has nothing directly to do with the term.

The chapter is a perfect doughnut!

The first source they cite is titled “Digital Lifestyle.” This source is somewhat more broadly related to the topic.

Then, the authors cite sources on “The Token Economy” and “Identity Ecosystems.” These two sources are closer to “Universal Wallets,” but neither directly refers to it.

Further sources revolve around “Blockchain Identity Management Systems” and “The potential of blockchain in education and health care.”

The last source is a report from the World Wide Web Consortium on “Universal Wallets.” When the academic literature is not yet extensive, reports from industry can also be helpful.

From this example, you can see how to write a literature review section on a topic without using a single academic source on that topic!

Avoiding the 5 mistakes I mentioned have taught you how to search literature effectively.

So from now on, “My topic is too new” is no longer an excuse. And if you meet someone who uses this excuse in your presence, send them this article! 🙂

Categories
Uncategorized

The Netnography Methodology by Kozinets (12-Step Tutorial)

Netnography is a qualitative research approach focused on studying online communities and their behaviors. The method was first developed by Robert Kozinets and has since become an indispensable tool for many social sciences.

In this article, I’ll walk you through the fundamentals of netnography based on Kozinets’ 12-phase process and demonstrate how you can effortlessly implement it. By aligning your investigation with this established methodology, you’ll hopefully yield insightful findings related to the online phenomenon you’re examining.

What is Netnography?

Netnography is a modification of the term ethnography, representing a research approach that deals with field research – but on the Internet.

The architect of this methodology is Robert Kozinets, who extensively details the approach in his 2010 book, “Netnography.” Now there is also an updated edition from 2015.

Up until that point, online research was keenly centered on conducting precise and quantitative investigations on social media or within online forums.

How often was a tweet liked, and how did that correlate with its reach? How do networks form on social media? What statistical correlations can be derived from user behavior?

While all these questions are vital and relevant, they aren’t the focus of netnography. Instead, netnography seeks to understand the context of such behaviors, shedding light on who exhibits certain behaviors and why.

If you familiarize yourself with the objectives of classic field research (ethnography), you’ll instantly grasp the netnographic approach. It revolves around observing groups and the behaviors of their members. Netnography simply transposes this research methodology onto the online domain.

The Phases of Netnography According to Kozinets

In the second edition of his book from 2015, Kozinets breaks down the netnographic research approach into 12 phases. Let’s delve into these together.

#1 Introspection Phase

Before you whip out your smartphone and get lost forever in the depths of Reddit, there are some fundamental questions about yourself you must address.

This step is inherently tied to the nature of ethnography. This type of research is entirely dependent on you, the researcher. This means that all your prior knowledge on the topic, your background, and your personal motivations will influence the design of your netnography.

Document the current state of your prior knowledge so that you can describe and reflect upon it in your netnography project.

#2 Investigation Phase

If you’re drafting an extended abstract or proposal for your netnography, this is the appropriate section to record answers to the following questions. If you don’t require such documentation, find another means to note them down for your own reference.

  • What phenomenon do you wish to investigate? (Frame a research question)
  • How do you plan to examine this phenomenon?
  • What kind of data are you looking to collect for this?
  • How do you intend to analyze the data?
  • How will the analysis contribute to addressing the research question?
  • What role do you see yourself playing during the netnography?
  • Under what ethical considerations are you approaching your netnography?
  • What advantages does netnography offer over other research designs?
  • What risks does netnography pose in your specific case (for research subjects)?

Especially crucial to advancing with your netnography is pinpointing the “study sites” – the venues where you plan to carry out your investigation. Is it a Facebook group? A Reddit forum? A YouTube channel?

Who are the individuals frequenting these sites? What would the ideal setting look like for your research to be most effectively conducted?

#3 Information Phase

Engaging with ethical considerations before you even start is of paramount importance. With netnography, you might be entering a protected space.

Users present in that space have certain expectations about it and their privacy. When you’re collecting data from there, it’s crucial to do so ethically.

The top priority is the so-called “Informed Consent.” This means you inform members of the online community about the nature of your research and obtain their approval. At this juncture, you can draft a text or document explaining all this.

You might need to register your study with your university’s ethics committee. To pass the ethical review, you’ll need a draft of your “Informed Consent” document.

Won’t the research results be distorted if users are aware they’re being observed? Yes, this is known as Consent-Bias and is a limitation of netnography. However, you have little choice in this matter because observing without the users’ consent is deemed unethical by almost every ethics committee in the world.

#4 Initial Interview Phase

In this phase, you begin researching communities and online platforms. You have two options for this:

  1. Directly search for the communities, e.g., through search engines.
  2. Initially identify the individuals that can inform your research and then determine in which communities or at which locations they engage with others.

For both ways, Kozinets recommends initial interviews. So, you converse with the individuals or, for instance, the admin of a community to better understand them.

By the end of this phase, you should have a list of potential communities suitable for your netnography. The interviews with members of the communities that make it to your netnography can be repurposed later.

#5 Inspection Phase

When conducting netnography, you’re spoilt for choice. Unlike traditional ethnography, the entire internet is at your disposal, with all its possible forums, groups, and platforms.

Therefore, compare the list of potential communities with your research question and decide which communities you want to study. Think carefully about why you’re making this choice so that you can justify this decision in your research design chapter.

netnography 3

#6 Interaction Entry Phase

Let’s see if Kozinets manages to start all phases with an “I”.

In this phase, the focus is on devising a strategy on how you’ll interact with the users of the community.

As you might know from my other tutorials, there are participatory and non-participatory observations. This principle of minimal to maximal involvement by you, the researcher, also applies to netnographies.

A low level of participation could involve merely reading in an online forum and not interacting with users. High participation might entail conducting interviews with the community members or even posting content yourself.

However, since direct interaction at the community level can often be too intrusive, Kozinets suggests creating an Interaction Research Website. In this scenario, you design a separate website independent of the actual community.

This website then facilitates the interaction between you and the individuals. The advantage is that you’ve secured consent from all participants, and portions of the community can interact with you, while others can abstain if they choose not to engage.

You can find numerous examples of such websites in Kozinets’ book.

You don’t necessarily have to code your interaction website from scratch; you can leverage existing platforms and tailor them to your needs.

#7 Immersion Phase

In the seventh phase, you venture into the field, beginning to interact regularly with the data, topics, and individuals.

The duration and specifics of your immersion depend entirely on you and your study. For inspiration, I recommend reading the research design chapters of published netnographies. There, researchers detail exactly how this phase unfolded for them.

Don’t stress at the beginning of this phase. There’s no right or wrong, no too much or too little. Your understanding of your community and your netnography project will grow over time. The more you immerse yourself, the clearer the overall picture becomes, and the next steps naturally present themselves.

#8 Indexing Phase

This phase is about organizing your data. Often, you’ll have more data at your disposal than you can analyze.

So, the task is to compile a manageable yet meaningful amount of data to proceed with your analysis.

To do this, you’ll need to assess your data. What are particularly important data sources, and what can be neglected?

It’s advisable here to select fewer but high-quality data sources rather than many of low quality.

#9 Interpretation Phase

You’re free to choose your analysis method. Remember that Netnography is a methodology, that means that you still have to choose your methods you want to use for data analysis within this research approach.

Qualitative methods that stand for an interpretivist approach, are suitable. This includes all methods that operate on the principle of hermeneutics.

Phenomenological, existential, or humanistic approaches are also possible.

A typical analysis method that aligns well with netnography are Grounded Theory techniques. On my channel, you’ll find plenty of tutorials on various qualitative research methods.

#10 Iteration Phase

If you’re already familiar with hermeneutics, Grounded Theory, or other qualitative approaches, then this phase will seem familiar.

Netnography does not proceed linearly. This means all the steps you learn here are not conducted from 1 to 12 in sequence and then you’re done.

Netnography is meant to proceed in iterations, which is why these steps should be understood as a cycle. You can (and should) revisit any phase of your netnography and repeat steps when you deem it meaningful.

For instance, if you’ve gained a significant insight through coding with Grounded Theory, return to the Immersion Phase and look for this specific insight. That’s just one example of an iteration, and there are many more. So, perceive these phases not as rigid but flexible.

#11 Instantiation Phase

In the penultimate phase, the focus is on shaping your netnography into a tangible form. For most of us, this means producing a research paper. So, consider the best possible structure to present your netnography.

As always, my tip is: don’t reinvent the wheel, but draw inspiration from examples you enjoy reading.

According to Kozinets, there are four different forms of netnography instantiation. These are:

  • Symbolic
  • Digital
  • Auto
  • Humanistic

Discussing all these forms here would be beyond the scope. Thus, I trust you’ll dive into Kozinets’ book to acquaint yourself with them, assign your netnography to one of these types, and align your research paper accordingly.

However, the presentation of your netnography doesn’t always have to be (just) an academic text. You can let your creativity run free.

netnography 2

#12 Integration Phase

What happens now that you’ve completed your netnography? All the hard work shouldn’t just be read by academics; it should also have an impact on the world out there.

This could be in the form of a publication, a YouTube video, a workshop, or an event with the community you worked with.

  • What can you give back to this community?
  • How can your results make the (online) world a little better in a lasting way?

This phase doesn’t end with the submission of your research paper.

The netnography is now a part of you and your story.

Categories
Uncategorized

Exam Preparation? This STUDY METHOD is all you need.

Are you deep into exam preparation and need to memorize your study materials as best as you can?

Then this article is tailor-made for you – I’ll introduce you to the ultimate study method that will engrave the material into your memory and let you recall everything effortlessly on exam day.

This study method is grounded in two core principles, proven over decades of educational research, to be essential for outstanding exam performance.

By implementing the method from this article, you won’t need to second-guess whether you’ll perform well in the exam in the future.

Insights from 100 Years of Education Research (The Short Version)

For many decades, research has been conducted focusing on individual learning success as the dependent variable and understanding how our brain retains information.

From this, one would theorize that we could derive recommendations for your exam preparation, leading to an optimal learning strategy. Right?

Absolutely.

The first thing you need to know is the “Two-Stage Memory System,”

the most widely recognized memory model in the literature. It is also known to many as the distinction between “short-term memory” and “long-term memory”.

The reason we quickly forget things is due to “catastrophic interferences,” which are new pieces of information that overwrite old ones.

Only through repeated and active recall can the information be transferred to the second system, commonly referred to as long-term memory (Rasch & Björn, 2013).

The Forgetting Curve

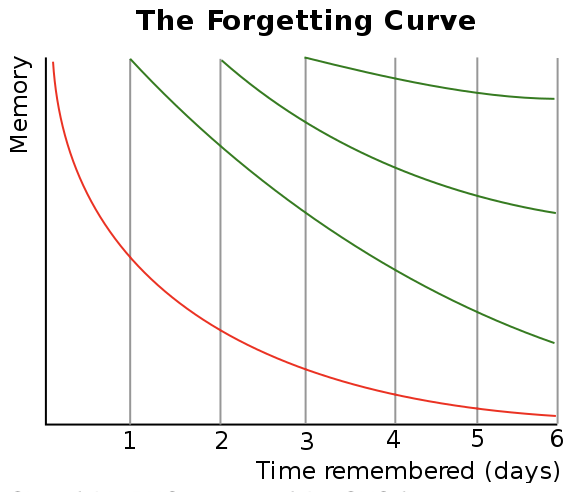
The German researcher Hermann Ebbinghaus made a significant mark in psychology with a series of self-experiments. He was the pioneer in describing the so-called “forgetting curve.”

exam preparation

The curve describes that we forget the majority of information shortly after learning it. However, by incorporating regular repetitions, the curve becomes less steep. Consequently, the intervals between repetitions can gradually increase over time.

For instance, if you’re studying an important slide deck for an exam, it makes sense to schedule a revision the very next day. Then, the next repetition could be after 2 days, followed by 4 days, and so on.

What Ebbinghaus did not know back then: The steepness of the curve depends on the type of content. Principles or laws are retained for longer than, for example, numbers and dates or, as in Ebbinghaus’ experiments, unrelated syllables.

The more abstract and numerical your study material, the more repetitions you’ll initially need.

Building upon Ebbinghaus’s discoveries, the concepts of “Active Recall” and “Spaced Repetition” emerged later as the ultimate study techniques.

Active Recall for Exam Preparation (Principle #1)

In contrast to Active Recall, “Passive Intake” refers to the mere passive consumption of information, such as quietly reading a script or a textbook and making annotations.

While this method may feel relatively effortless and relaxing at the outset, it’s not the most efficient way to retain the content. This is because very little actually sticks in your memory.

The more effective method is to actively retrieve the study material.

Here’s how it works:

Pose a question to yourself, similar to one you might encounter in your exam, and attempt to answer it aloud, relying solely on your memory.

Flashcards are an ideal tool for this technique.

Write the question on the front and the answer on the back. So, when working with a script or book, your main goal should be to quickly transfer the content you need to learn into this question-and-answer format on flashcards.

If you can’t fully answer a question, revisit the provided solution.

To devise a study schedule that factors in the forgetting curve, let’s delve into the second study technique.

Spaced Repetition for Exam Preparation (Principle #2)

Essentially, I’ve already touched upon the principle. It’s about scheduling repetitions just before you’re about to forget the content.

Given that the forgetting curve becomes flatter over time, the intervals between repetitions can be extended.

This approach often contrasts with typical study habits. Many of us briefly review content once, then, driven by pre-exam panic, attempt to cram as many repetitions as possible in a short period.

Ideally, the process should be the reverse: You should study at shorter intervals at the beginning of your preparation and only need a single review right before the exam.

Especially when facing multiple exams in a brief timeframe, plan your reviews such that the intervals between them are synchronized across the various exams. This approach maximizes the benefits of the Spaced Repetition principle.

Algorithmic Personalization in Exam Preparation

Using both Active Recall and Spaced Repetition in your exam preparation is undoubtedly powerful.

However, research on this subject has introduced another method on top of them that significantly boosts learning outcomes.

Here’s What the Science Says

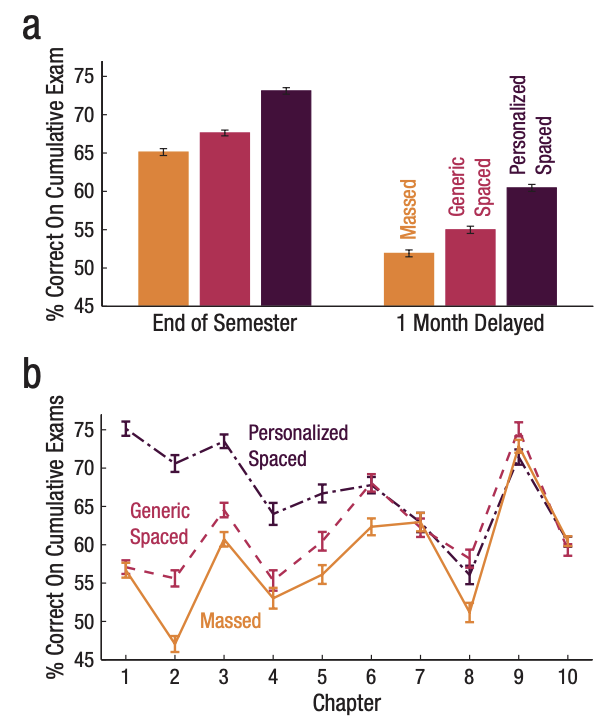
In their study, Lindsey et al. (2014) examined three learning methods.

The first method is something we’re all too familiar with from school and university. Each week, a topic or chapter was covered, which was then assessed via a quiz.

The second method was based on the Spaced Repetition principle. All participants in the study were presented with topic content in their learning app, with increasing intervals between repetitions. These intervals were standardized for everyone.

For the third method, participants were given a learning app that personalized the intervals with a simple algorithm. If a question was answered incorrectly, the next repetition came sooner than for the questions that were answered correctly.

The app’s algorithm thus adjusted the intervals and the number of repetitions individually for each participant during their exam preparation.

The results were conclusive.

exam preparation 2

Method 3, that is, personalized Spaced Repetition, significantly outperformed the other two. Even a month after the exam, the contents were best recalled by this group.

Software for Algorithmic Personalization

The easiest way to implement algorithmic personalization for your exam preparation is through software.

There are various flashcard apps available. When choosing one, make sure the app adjusts repetition intervals based on your answers. This typically happens through a feedback mechanism.

You can indicate how well you were able to answer the question on a flashcard. If you rate your answer as poor, the app will present the card to you again sooner than others.

This way, you compel your brain to perform at its optimal memory capacity.

Examples of Apps that implement this feature include Anki, Brainscape, Quizlet, Cram, and IDoRecall.

Categories
Uncategorized

How to Write a Methodology Section 

You would like to know how to write a methodology section effectively?

In this article, you’ll discover how to do so, regardless whether you are working on a paper, a thesis, or a dissertation.

When I mean methodology section, I’m referring to the section that you position after the literature review and before presenting your results.

This means that this tutorial is for you if you are working with empirical data or a systematic approach to analysing literature.

We will cover everything from quantitative, qualitative, and mixed methods approaches in this article.

The difference between methodology and method

A very common rookie mistake is to confuse the concepts methodolgy and method.

Don’t do that.

A methodology describes an overarching research strategy, which can involve multiple methods. An empirical method is a single procedure that can help you to collect or analyse data.

An example for a methodology would be case study research. And under the umbrella of this methodology, you can apply qualitative methods, for example.

Writing your Methodology Section

In this very important section, you outline your research design, which means the complete process you apply in this particular study to gain new knowledge and answer your research question or questions.

You need to demonstrate how well-thought-out your research design is and how neatly you’ve aligned your data collection and analysis methods.

For every empirical research project, this is one of the most important criteria for anyone who reviews your work.

A good thing is that the fundamental principles for writing a methodology section remain the same. This means that you can learn a formular that you can follow again and again.

After internalizing the three fundamental principles that I am about to show you, I strongly recommend delving into two, three, or even four papers that follow a similar methodological approach.

You’ll quickly recognize these fundamental principles and can apply them to your own work.

#1 Start with the research paradigm or a framework

To start your methodology section, you should state the paradigm you are following (i.e., quantitative, qualitative, mixed methods, review, design science, action research, etc.).

You then name a specific framework or an author that provided guidelines that you follow for your data collection and analysis.

After many decades of empirical research in various disciplines, some works and authors have emerged who have developed a sort of scientific consensus.

So, you don’t need to do anything other than follow their guidance.

Research the most cited methodological frameworks in your discipline and compare which one is best suited for your study.

For example:

  • “Case Study Research – Design & Methods” by Robert Yin is a standard reference for conducting case studies.

However, if you are planning a more interpretative case study, another framework is probably more suitable, as Yin’s approach is best suited for quantitative research within the case study paradigm.

Once you have chosen a framework, follow the suggested approach as consistently as possible, and be sure to cite it in your methodology section.

The steps outlined in your chosen framework will now determine how you structure the rest of your methodology section.

To do this, you simply describe the steps in chronological order.

#2 Stay True to the Process

After you clarified what your overall approach is, you begin to describe each method. You should structure this part in a way that explains your workflow step by step, in chronological order.

You typically begin with the data collection method.

For example, for a quantitative online survey:

  • How was the questionnaire developed?
  • How was the survey created (technically)?
  • Was there a pretest? How was it conducted, and what were the results?
  • How were participants recruited?
  • How was the composition and size of the sample determined?
  • What analyses (statistical tests) were calculated and using what software?
  • Are there reliability measures you can report?

Example for qualitative interviews:

  • What is a good description of your case? (only for case studies)
  • How was the interview guide developed?
  • How were the interviewees recruited?
  • How was the composition and size of the final sample? Why did you make these choices?

You then continue with the analysis method.

  • What analyses (e.g., content analysis) were conducted and using what software?
  • What coding scheme did your analysis follow?
  • Are there reliability measures you can report?

You can divide things like case description, data collection, and analysis in different sub-sections to structure your methodology section. It is important to use very standardized headings like “data collection”.

Nothing fancy here.

Additionally, you should not reveal any results at this point.

The methodology section only describes your research design so that it could be replicated by anyone.

Transparency is crucial, and even unexpected incidents such as a failed pretest or a revised codebook are not a problem.

They contribute to adding depth to your approach and show that you have followed good scientific practices.

How to Write a Methodology Section 2

Secret Tip: Create a Figure

Before we dive into the third and final fundamental principle, let’s explore a secret tip: illustrating your research design.

This means that you visually represent your research design that is both clear and engaging.

Build on the framework you referred to in the beginning, but apply it specifically to the combination of methods that you have chosen.

For example:

How to Write a Methodology Section 3

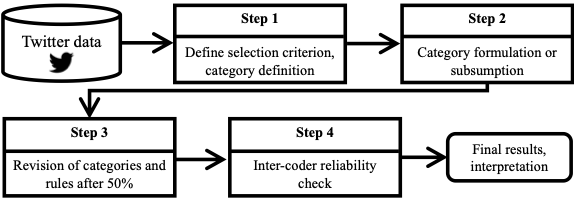
In this study, a qualitative content analysis of Twitter posts was conducted. Following the figure, the individual steps 1-4 would then be described in chronological order in the text.

The figure just makes it more appealing and allows the reader to see the whole process at a glance.

#3 Connect Each Step with a Justification

Even if you follow a framework meticulously, you may sometimes encounter unplanned changes, dilemmas, or too many options. In such cases, you need to make tough decisions.

The methodology section is not only a description of your research design but also a continuous justification of your choices.

As you learned before, you should explain each step sequentially and ideally refer to a scientifically recognized framework.

Now, in the final step, ensure that you logically link the individual steps with justifications. You can roughly remember it like this:

For each step you describe, write another sentence explaining why this step was the best and most logical choice. To practice this, you can review your logical chain at the end. You can also back up your justifications with literature.

Here’s an example:

We chose a multi-case design as it allows the development of more robust insights by identifying key practices of organisations that go beyond the idiosyncrasies of individual cases (Eisenhardt & Graebner, 2007)”.

Why a Case Study?

“Due to the fact that Augmented Reality has only been sparsely adopted in the crafts industry (reference here), and Company XY has been actively promoting the use of AR glasses in production for two years, participating in the pilot project ABC, which was the first to implement DEF in practice in Germany, a case study of this company is suitable to investigate (content of the research question).”

Why Qualitative Interviews?

“The identified needs for theory-building in relation to this topic in the literature, combined with the novelty of the technology in the context of the crafts industry, necessitate the creation of a qualitative data foundation to identify requirements, motivations, and barriers.”

Why A content analysis?

And so on…

I think you get the idea.

As you can see, the methodology section consists of a sequence of steps and their justifications.

The quality of this chapter will be largely judged based on how well you are able to justify your decisions.

How to Write a Methodology Section shribe

One Last Note

Sometimes, you may have to make a decision where you’re not sure which direction to go.

That’s perfectly fine.

And sometimes, there’s no right or wrong; there’s only well-justified and poorly-justified.

The key is to make a decision and then describe, in a comprehensible manner, why that decision makes sense both methodologically and conceptually.

If you can do that, there’s nothing standing in the way of a high score for this section in the evaluation of your research project.

Categories
Uncategorized

Qualitative Data Analysis with ChatGPT (extremely time-saving)

Qualitative data analysis with ChatGPT is new kid on the block in research nowadays.

This includes thematic analysis, grounded theory, and content analysis. All these methods can benefit from AI.

Because, unfortunately, qualitative data analysis is extremely labor-intensive.

For example, interview transcripts sometimes need to be analyzed sentence by sentence.

Wouldn’t this be a task where you could wonderfully get support from ChatGPT?

Qualitative Data Analysis with ChatGPT

Qualitative data analysis can be used to summarize or structure large amounts of qualitative data, i.e., interview transcripts, documents, or social media postings.

Summarizing means abstracting the content by forming categories, a process also known as “coding.” You assign a “label” to small units of analysis, such as an answer to an interview question, and can thus present hundreds of pages of text in a single category system.

Summarizing also means that you don’t know in advance what categories will emerge. This approach follows an inductive logic, from specific (the data) to general (the categories).

Structuring means assigning the content to pre-defined categories. These categories can, for example, be derived from the literature. This results in a so-called codebook that specifies when an analytical unit corresponds to a certain category.

Both tasks are extremely labor-intensive and repetitive.

That means they are tailor-made for artificial intelligence, or even better, for a language model like GPT.

So, how can we best integrate ChatGPT into the qualitative data analysis process? In the following, we’ll look at 7 steps to turn ChatGPT into your personal research assistant.

The following steps are loosely based on the working paper by Zhang et al. (2023) from Penn State University, where the authors summarized the best practices in prompt engineering from 17 qualitative researchers.

In case you did not know, prompt engineering refers to crafting the instructions you give to ChatGPT and other large language models.

Qualitative Content Analysis with ChatGPT

#1 Start your Prompt with a Role-play

Several experiments with ChatGPT have shown that assigning a role can significantly improve the quality of results.

Let’s look at an example.

In our case, ChatGPT is supposed to conduct a thematic analysis with interview data we have collected. So, think of a role that fits this context. For example:

“Imagine you are a researcher and an expert in the evaluation of qualitative data, such as interview transcripts.”

#2 Provide ChatGPT with Context

To perform a qualitative data analysis with ChatGPT, a two-line instruction won’t get you very far. You need to formulate your prompt as detailed as possible to get the best results.

Just imagine you’re talking to someone who is very intelligent but is doing the task for the first time. For our thematic analysis, it could look like this:

“I will provide you with an interview transcript that you should analyze using a method called ‘thematic analysis.’ Your task is to assign categories to the answers in the transcript. A category is an abstract summary of the content. You should not assign categories to the questions themselves.”

#3 Give ChatGPT a Detailed Description of your Qualitative Method

The prompt should describe as precisely as possible what the goal of the task is. This also includes aligning the prompt with the specific goal you have in mind. Let’s say your interviews are about the topic of Remote Work and Stress.

Then you should formulate your prompt accordingly. Always keep in mind that ChatGPT only knows as much about the task as the information you provide to the AI.

“The interview transcripts focus on the topic of remote work. Specifically, the categories you create based on the answers should relate to how remote workers experience stress and what countermeasures they take in this context.”

The level of detail cannot be too high. It’s important not to rush and take your time when composing the prompt.

Qualitative Content Analysis with ChatGPT 2

#4 Specify How Results Should Look Like

If you’re working with pre-defined categories or a codebook, now is the time to explain to ChatGPT into which categories the data should be classified. You can also include a complete codebook if you have one.

However, for our example, we’ll continue with an inductive analysis, which means that we develop them from scratch.

Here, we want ChatGPT to keep the categories from being too abstract. I would recommend using the AI only for the labor-intensive tasks, which typically is the first round of coding. This step is often referred to as “open coding”.

Later, when we develop more theoretical codes or themes, we involve our brain a bit more and use our creativity.

For the open coding, we want ChatGPT to give us some examples from the data that represent these categories well.

“Don’t give me more than 10 categories for the first 3 transcripts and, for each category, find a text example of at least three sentences that best reflects the category.”

#5 Structure Your Data

ChatGPT delivers better results when you structure the transcripts.

That means not just copying and pasting but making sure the format of question and answer is consistent.

Spelling errors or punctuation do not affect ChatGPT’s performance.

The easiest way to explain the structure of the transcripts to ChatGPT is as follows:

The transcripts are structured as follows:

<Interviewer (indicated by the abbreviation ‘I’)> : <Question (ending with ‘?’)>

<Participant (indicated by the abbreviation ‘P’)> : <Answer>

#6 Define the Format of the Results

To make it easier for you to process the results and continue to work with them, consider how ChatGPT should present them.

A table would be a good idea in most cases. You could integrate it into your prompt like this:

“Please present the results in table form. The first column contains the categories, the second column contains a description of the categories (at least three sentences), the third column contains the example quote, and the last column contains the number of participants who mentioned the topic.”

#7 Adjust as Needed

After you’ve entered your monster prompt and fed ChatGPT with the transcripts, you can still make adjustments as necessary.

If you feel like the 10 categories are too few, you can ask for more. If you think there are too many, you can instruct ChatGPT to prioritize the categories. For example:

“Reduce the categories to 8 and arrange the table so that the categories mentioned by the most participants are listed first.”

You can then transfer the output table to Excel, for example, and continue working with it.

Qualitative Data Analysis with ChatGPT: Things to Keep in Mind

Are you convinced by the results?

That’s great, but hold on a second. You should be aware of some important limitations of ChatGPT when it comes to qualitative data analysis.

Qualitative Content Analysis with ChatGPT 3

#1 Transparency of Analysis

It’s often challenging to understand how ChatGPT has formed the categories. The authors of the working paper found in their tests that two additional instructions not only improve the results but also enhance transparency.

“Analyze the transcripts sentence by sentence.”

With this instruction, you prompt ChatGPT to analyze the transcripts from beginning to end, just as you would manually. This makes it less likely that ChatGPT skips or neglects parts of the data. So, be sure to include this short sentence.

Another recommendation is to include the following sentence:

“Provide a brief explanation for each category, explaining how you arrived at the category.”

ChatGPT will then provide a description of how the categories relate to the data, making it easier for you to understand how the categories were generated.

#2 ChatGPT Can Get “Tired”

ChatGPT is a black box, meaning we can’t see what’s happening under the hood. If you overburden ChatGPT with many different instructions for an extended period, the quality of results may decline.

The AI is likely to improve over time, and differences between the Pro and free versions may exist, among other factors.

What you should do is create the entire prompt as best as possible and then let ChatGPT process it only once or make only minor adjustments afterwards.

#3 Reliability in Qualitative Data Analysis with ChatGPT

Experiments in which the API of ChatGPT is queried with the same prompts multiple times show that the results are slightly different each time.

This is also known as the “temperature” of the large language model.

The higher the temperature, the more varied the results.

As an average user, you rely on the default settings, where the temperature is not too high. However, what you can (and should) do is perform a manual reliability check, just as you would when coding with another person.

If you’re wondering why I’m not discussing research ethics and plagiarism in this video, simply check out my ChatGPT plagiarism video. There, we cover everything you need to know to use ChatGPT correctly as a tool for your academic projects.

Categories
Uncategorized

How to Write a Literature Review with AI (revolutionary)

Are you feeling completely overwhelmed and don’t know how to start your literature review?

On top of that, time is running out, and you can’t afford to spend hours searching through various databases?

Fortunately, there are new, smart AI tools that are revolutionizing the world of scientific research.

In this article, I’ll show you the top 4 AI tools currently available that will help you write your literature review faster than ever before.

And I’m not talking about days—I’m talking about minutes! Let’s dive into how to write a literature review with AI!

#1 Paperdigest.org

If you’re in search of relevant publications on a specific topic, then paperdigest.org is the perfect tool for you.

You can easily input the subject of your research, for example, “Organizational Identity,” and with just one click, you’ll receive a comprehensive list of references for that theory.

The best part is that you have the option to choose: you can decide whether you want to see all the recent papers from the past year, the last five years, or all available papers.

Here, you need to tailor your search strategy to the goal of your literature review.

Goal: Explain a Theory

If this is your goal, I recommend selecting all available papers without any time restrictions and then working your way towards the more recent works.

If you’re writing a chapter about an established theory, you should never neglect foundational papers. These can be several decades old.

The AI tool provides you with an overview of how the theory has evolved over time and how you can narrate the theory’s development.

However, always incorporate your specific research question and your own argument while writing.

What you definitely don’t want is a theory chapter that sounds like it was generated by AI and reads like a Wikipedia article.

Goal: Review the Current State of Research

If this is your goal, then set the parameters to limit the selection to papers from the last 2-3 years. If the results become too sparse, gradually expand the time frame.

But don’t forget to check if there might be an extremely important paper that stands out. You can identify this by the number of citations.

You can selectively complement your literature selection from the last 2-3 years with these seminal papers.

What Else Can the Tool Do for You?

But that’s not all.

Paperdigest not only provides a list of papers but also summaries of these works.

You can create up to 5 summaries for free each day. If you need more, you can get the full version, which currently costs about 10 dollars per month (as of September 2023).

Remember to export or save the list of papers, as it can serve as a starting point for your further work in your literature review.

Paperdigest is best suited for when you’re not sure where to start with your literature review.

This way, you’ll get a summary of the most important and influential works on your topic. From there, you can continue your review.

At this point, I would like to remind you that you should not blindly use Paperdigest or any other of the following tools.

They are currently the best tools on the market, but they are not perfect yet. The AI in this field is just getting started and is constantly evolving.

The quality of your literature review still depends on you and how well you can connect the literature with your own argument and an original research question.

#2 Elicit.org

Thanks to Paperdigest, you now have an overview of your topic.

As you read the papers, make note of all the questions that come to your mind.

And now, our next tool comes into play: Elicit.org (which is currently free to use).

There is also a newer version available on elicit.com, but for the purposes I’m showing you, you should use elicit.org.

When you go to elicit.org, you can ask the tool a research question or enter all the questions that came to your mind while reading the papers.

Let’s take an example.

Let’s say you want to explain the theoretical concept of organizational identity in your literature review. Simply ask elicit: “What is organizational identity?”

And you’ll instantly receive a list of relevant sources.

If you sort them by citations, the most relevant articles will be displayed. Or you can sort them by year so that the most recent papers appear at the top.

If you click on the question box again, you can click on “Brainstorm more questions,” and you’ll be presented with additional questions related to your topic.

For example: “What are the components of organizational identity?” or “How does organizational identity affect employee engagement?” And you can again view relevant sources for these questions.

By doing this, you can delve even deeper into your topic and conduct an excellent literature search for your review.

One of the best features is also that you can display a summary of the abstract to quickly assess its relevance to your work.

Furthermore, you can view additional details of the papers, such as the number of study participants, interventions, and results.

This is especially handy if you want to examine papers based on their methodology.

how to write a literature review with ai

#3 Litmaps.com

Would you like to have a visual overview of research literature? This could be especially interesting if your entire work is a systematic review and you want to create visual representations.

In this case, the tool “Litmaps” comes into play (the free version, in my opinion, is sufficient).

With Litmaps, you can see the order in which the literature was published, how it is interconnected, and how it relates to each other.

Furthermore, the tool provides recommendations for additional papers you could include based on this information.

Here, you get a comprehensive overview of the current state of research and can be confident that the sources are relevant to your topic.

Litmaps also only displays papers that have been cited multiple times. This ensures that these works are important to other researchers as well.

Because what Litmaps represents are called citation networks. A paper is a node, and the connections between papers are the references made between them.

When you select a specific paper, you can see all the works connected to the original paper.

When you click on a paper, you get a summary, references, citations, and other works strongly related to the topic.

This makes it easier for you to select and delve into relevant literature, and it can enrich your literature review with a compelling visualization.

how to write a literature review with ai 2

#4 jenny.ai

The next tool is truly next level because it practically writes the review for you.

Here, you’re quickly entering the gray area between AI being a helpful tool and plagiarism, but we’ll discuss how to handle this at the end of the video.

With jenny.ai, you’ve never written a literature review as quickly before.

Generating text with Jenni.ai

After logging in, you can create a new document. Let’s say you’re working on a literature review, in which you’re using organizational identity as a theory.

Immediately, you’ll receive suggestions on how to start. If you like a suggestion, you can accept it, and Jenni AI will formulate the next sentence based on that. However, you can also ask for more suggestions until you’re satisfied.

Furthermore, you can introduce your own ideas into the tool to steer the text in a specific direction. Jenni AI can then continue to work based on this input and provide you with further text suggestions.

When it comes to citations, the tool is quite helpful as well. Currently, this is a weakness of many other tools, such as ChatGPT.

Suppose you want to include a citation. You simply highlight the relevant text, click on “Cite,” and Jenni AI will search various sources for relevant publications to support the sentence.

You can then easily add the desired citation. However, please note that you should verify the accuracy of your citations and the suggested sources. I cannot stress this enough, but you are responsible for doing so.

Jenny AI also offers various citation styles to choose from. My preferred style is APA, where the reference is placed in parentheses in the text. However, Jenni AI offers flexibility, allowing you to choose your citation style based on your supervisor’s requirements or the preferences in your research discipline.

how to write a literature review with ai 3

Ask Jenny

Another really great feature is the chat function.

With a click on “Ask Jenny,” you can ask Jenny to perform various tasks for you. Think of this function as ChatGPT but optimized for research.

For instance, you can ask for headings for your subchapters, and you’ll receive an outline to which text will be automatically generated. It really can’t get any easier than this.

Jenny AI is genuinely impressive when it comes to writing.

Unfortunately, this convenience comes with a price, but it’s still quite reasonable, in my opinion.

With the free version, the AI generates up to 200 words per day. If you need more words, you’re looking at 20 dollars per month (as of September 2023).

You can get 20% off if you use my code SHRIBE20.

My Assessment of Literature Reviews with AI Tools

AI tools are here to stay.

From my perspective, it doesn’t make much sense to ignore or refrain from using them just because they are new. However, that doesn’t mean you can skip critical thinking.

Even with AI tools, your literature review will only be as good as your ability to understand and utilize this new technology.

The four AI-powered tools mentioned here can help you find relevant sources, create summaries, and enhance your literature research.

Of course, this also doesn’t mean that you shouldn’t read for yourself and become an expert in the subject of your research. It would be embarrassing if you were asked a substantive question about your work, and you couldn’t provide an answer.

Don’t leave the thinking to AI, but rather delegate repetitive tasks to it. Use the time you free up not to scroll through social media but to invest your cognitive resources in creative thinking that enhances your academic work.

As always, what we discussed today also means that you should be transparent about your use of AI. Describe in your methodology section or declaration how and which tools you used as aids.

Having gone through the steps, you now know how to write a literature review with AI!

For more on this topic, refer to my ChatGPT plagiarism video.

Categories
Uncategorized

Developing an Interview Guide for Qualitative Research

Developing an interview guide for qualitative research projects can be overwhelming at first.

How should you structure the guide?

How do you translate a theory into specific questions?

And what is the difference between open interviews, semi-structured, and structured interview guides?

Help is on the way.

Because in this article, I want to answer all these questions and provide you with a comprehensive tutorial that will allow you to create your interview guide in no time.

To ensure that this video is not just semi-structured like your guide, I have divided the process of creating an interview guide into 5 steps that are easy for you to follow.

By giving you concrete examples for each part of your guide, your interview preparation will become the foundation for an outstanding qualitative research project.

#1 Developing an Interview Guide: Use an established formula

When developing an interview guide for qualitative research projects, you don’t have to reinvent the wheel. The structure for such a guide almost always looks the same. Here’s how it goes.

Before the Interview

The first element of developing an interview guide for qualitative research includes some instructions for you as the interviewer. These are essentially “director’s notes” that you can follow to initiate the interview.

developing an interview guide for qualitative research

#1 Introduce yourself

This includes your name, age, and the role in which you are conducting the interview.

#2 Thank the interviewee for participating

Interviewees allocate valuable time from their work or even personal life to answer your questions. You shouldn’t miss the opportunity to sincerely express your gratitude.

#3 Provide a brief hint about the research objective

However, you shouldn’t disclose the specific details or research question in advance, as you don’t want to impose any biases on your interviewee. Nonetheless, it is appropriate to give the interviewee some context so they have a rough idea of why they are part of the study.

If you’re unsure, you can also preformulate and read this hint about the research objective. Of course, you can also deliver it freely, but only if you are very confident.

#4 Information on anonymous data handling

Here, you can provide the following information:

“The audio data from this interview will be recorded, transcribed, anonymized, and aggregated. The results will be prepared as part of a study at XYZ University. Recordings will be deleted from all devices upon completion of the study.”

And, of course, you should follow through with this!

#5 Obtain consent

“Are you willing to consent to the recording of our conversation for analysis purposes? I assure you that your anonymity will be maintained, and no inferences about your personal identity will be possible.”

#6 Address any open questions

“Do you have any questions before we begin the interview? If so, feel free to ask them now.”

#7 Start recording

Press the record button. 😉

After the Interview

Even immediately after the interview, you also have a small section you should incorporate in your guide.

#1 Stop recording

Cut! You’ve got it in the can.

#2 Express your gratitude for their participation (yes, once again!)

Yes, even after the interview, you thank them once again. I once had an interviewee who didn’t hang up on time, and I could still hear their loud and relieved sigh. Conducting such an interview for an hour or even longer is exhausting and certainly not taken for granted!

developing an interview guide for qualitative research 1

#3 Announce a report about the results

Remind your interviewee once again that the results will be nicely presented after the study is completed, so they or their organization will gain something tangible from it. This serves as a reminder that they also benefit from participating. Of course, you should follow through on this and, even if it’s not part of the submission, create a cool PDF or some sort of briefing that provides added value to the participants.

#4 Snowballing

If you’re in the midst of your study and need more interviewees, now is the perfect time to ask if the person knows anyone else who would also be suitable for the interview. Either the person is so fulfilled by the good deed of participating in the study or so exhausted that they insist their friends and colleagues must have this experience too!

This way, you skillfully expand your sample.

#2 Developing Interview Questions

Now let’s move on to the question blocks of your interview guide. The first block is typical for all interviews interviews, regardless of the topic.

It is all about getting to know the interviewee.

Block 1: Personal and Organizational Information

If your interviewee is not representing an organization or company, you can omit these questions and instead focus on determining their expertise related to the research topic using comparable questions.

How old are you? What is your current position in the company? How long have you been working in the company? How much work experience do you have in your current position (in years)? What is the core business of your company? Which industry would you classify your company in? Of course, you can replace “company” here with any NGO, association, or research institution.

Block 2-X: Open Ended Questions

In this section, you develop your main interview questions.

A good strategy for developing an interview guide for qualitative research is to divide it into blocks. Each block has questions about your research topic.

For a semi-structured interview, it makes sense to move from unstructured to more structured questions.

However, in this part of you guide, all questions should be open-ended. This means that the answer cannot be yes or no.

Two example for an unstructured question is the follwing:

“Please tell me about your experience while you were working at company X.”

or

“What do you know about topic Y?”

And here are two examples for structured questions:

“What are the core values of your organization?”

or

“How do you typically learn new negotiation techniques?”

Make sure to ask the same structured questions in each interview so you can better compare the answers.

So far, we have explored examples of interview questions that aim at investigating a certain research topic.

However, you might also want to develop your questions based on theory, so you can relate the answers you get to what the literature says or a specific theory would predict.

developing an interview guide for qualitative research 3

#3 Using Theory to Develop Interview Questions

The following recommendations for creating an interview guide are specifically tailored to a semi-structured, theory-driven interview.

This means that you conduct your interview with a particular theory or body of literature in mind. You want to explore a research subject to better understand it, applying a pre-existing perspective.

The key factors here are, first, having a theoretical background for your study, which you can learn about in my tutorial on the theoretical background of a research paper.

Furthermore, you should already be aware that you will be employing a deductive approach to analyze your interviews, meaning you will translate certain dimensions of a theory into categories and assign the content of the interviews to this predefined framework. You can learn all about this type of analysis in other tutorials. In this tutorial, we focus on the data collection and not the analysis.

Okay, so how do you determine the theoretical dimensions?

It’s quite simple. You just have to consult the literature. To illustrate this, let’s look at an example.

An Example of Using a Theory to Develop an Interview Guide

Suppose you want to understand how the identity of a company is formed when it operates exclusively remotely, meaning from home offices or as digital nomads.

To understand this, you turn to, surprise – Organizational Identity Theory. According to Albert & Whetten (1985) and Whetten (2006), this theory consists of three different dimensions:

Ideational dimension (How the organization understands itself collectively) Definitional dimension (Attributes of the organization; differentiation from other organizations) Phenomenological dimension (Actions and discourse in relation to identity) The specific details of each dimension are irrelevant for this example. What’s important is that you now consult the theory and break down each dimension into its constituent elements, as described in the literature.

Build on existing interview guides

Additionally, you should research whether this theory has already been used in previous interview studies in similar contexts. If so, delve into the sources and examine the guides used by other researchers. This can serve as a great reference for your own guide, but make sure to cite the corresponding source.

Develop your own questions

If you can’t find anything suitable, you’re on your own when developing the interview guide. Let’s take the first dimension of the theory as an example: Actions and discourse in relation to identity.

Instead of asking this question directly, you need to read up on how these actions or discourse could manifest. For example:

How does the company describe itself in job advertisements? Are company events designed differently? How do top managers behave in public appearances?

Now you can transform these questions into more pragmatic interview questions. It would also be possible, for example, to create two different guides, one for executives and one for other employees. Here’s an example:

Executive: How would you describe your company in brief profiles on job boards?

Employee: What understanding did you have of the organization before applying?

Executive: What impression of your organization do you want to convey in public appearances?

Employee: In your opinion, what impression do top managers convey in public appearances?

#4 Develop follow-up questions

The semi-structured nature of your guide allows you to formulate sub-questions to further drive the conversation. You shouldn’t interrupt your interviewees and should give them as much freedom as possible. However, if they struggle or don’t understand the question, you can refer to your follow-up questions.

But if the conversation is heading in an interesting direction, ask questions that make sense in that moment. The guide is only semi-structured, meaning you can deviate from it. Sometimes, this is the only way to discover truly exciting things.

For the first question, the following follow-up are suitable:

Executive follow-up: Does the impression of the organization you had at the founding differ from your current understanding, now that you employ X employees?

Employee follow-up: Does the impression of the organization you had back then differ from your current understanding, now that you have been working there for X years?

Or for the second question:

Follow-up (for both): Do you differentiate between social media, press releases, podcasts, TV, etc.?

developing an interview guide for qualitative research shribe

#5 Testing and Adjusting the Interview Guide

The beauty of a qualitative research design is that you can move back and forth between the data collection and analysis phases. For a detailed understanding of this process, you can refer to tutorials on the topic of hermeneutics.

In essence, after conducting 2-3 interviews, you can transcribe or paraphrase them to reflect on the flow and structure of the conversations and the guide. If adjustments are needed, you can make them at any time.

This iterative process allows your guide to become more coherent with each interview. So, don’t be afraid that an interview was a waste if everything isn’t perfect the first time. Prepare your guide as explained in this video and go out and test it.

The rest will come naturally.